This tutorial demonstrates how to create and import MySQL tables using MySQL Workbench.
Websites & Databases
The internet is all about sharing information and web pages, like all documents in general, are a great way of keeping information organized, accessible and legible. Most information throughout history has been stored on documents, from books, newspapers, and legal forms that are kept in libraries and file cabinets, to webpages that are stored on server computers and accessible by anyone from anywhere.
Databases are software that have been developed to go farther than documents can go in managing information that can be structured into tabular data sets. Think of a collection of baseball cards. Each card has a photograph and some information about a player, and on the back there is a data table of the player’s career statistics. A stack of baseball cards holds a massive amount of information. However, it is difficult to generate information that relates across players; for example it would take a calculator and some time to determine the average number of home runs hit by the players in your collection, or what were the top ten batting averages in order. Using a relational database management system such as MySQL, you can store tabular information into tables and use the SQL query language to to answer such questions with very simple syntax. A relational database allows you to organize the data in multiple related tables for the most optimal design and data integrity. And with a relational database server like MySQL you can program your webpages to run these queries and present information right into your internet documents . We will be using PHP to program the database access functions and initially we will be using built-in server behaviors in Dreamweaver CS5 to code the PHP for us. In subsequent lessons, we will be using the Zend PHP framework for database access.
At this point it is important for you to see that the combination of web technologies like HTML/CSS/Javascript, PHP programming and MySQL are what make websites such as Facebook, Amazon, Google and Twitter work, as well as almost all web-based services and applications.
MySQL Workbench
Our curriculum will diverge slightly from the textbook in a few ways:
- Because of the network security policy of SRJC, we will be using MySQL Workbench instead of PHPMyAdmin to work with the MySQL database. MySQL Workbench is installed on the classroom and lab computers and you should install it on your own computer, it is free to download.
- The *_admin MySQL accounts on the SRJC servers do not have the security priviledges to create users or create databases so we will be using the database that was created for you, it should be the same as your username.
This tutorial demonstrates how to create and import tables using MySQL Workbench. It is complementary to the step by step tutorials on pages 157-161 and on pages 165-167 of the textbook, which cover the same techniques using PHPMyAdmin.
Setting up a Database Connection in MySQL Workbench
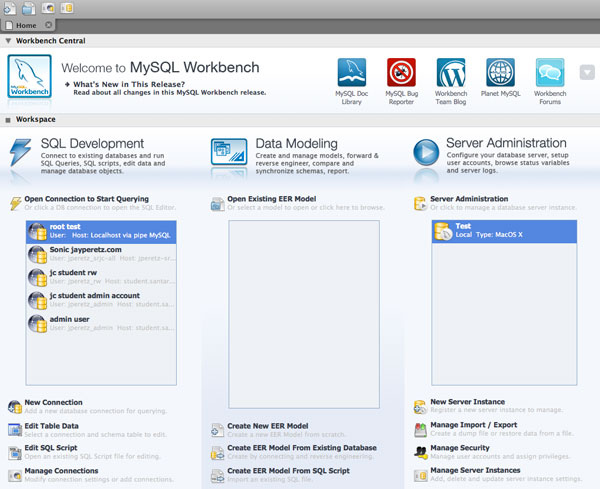
When you start up MySQL Workbench you will see this welcome screen. Most of the features we are going to use are in the SQL Development section on the left. Here is a very simple MySQL Workbench tutorial on the key features of this screen and the SQL Editor screen which we will be using. Here is the MySQL Workbench documentation that covers most of what we’ll be doing in this tutorial. Similar to Dreamweaver, MySQL Workbench has a feature that allows you to store and manage connections to the server, in this case they are connections to the database server not the webserver. The first thing we are going to do is create a New Connection so click on that link on the left of the welcome page.
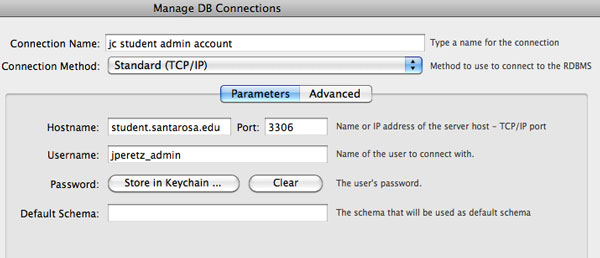 This is the connection manager but shows you how to configure your settings. There is a button to test your connect at the bottom of this page.
Creating a Database Table in MySQL Workbench
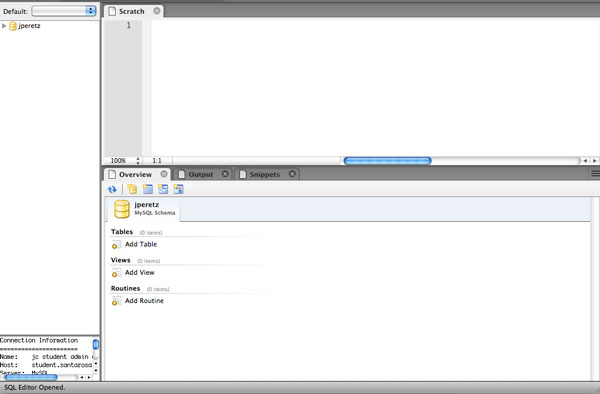
This is the SQL Editor interface in MySQL Workbench. It may seem confusing at first, but creating a new database table is very easy. Click on Add Table.
On this page enter the name of the table ‘users’ and use the MyISAM storage engine for the table (read more about this on page 160 of the textbook). Then click on the Columns tab.
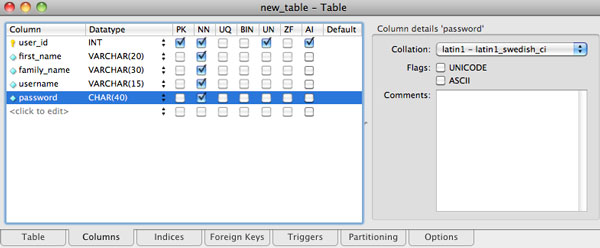
The Columns page looks very similar to the PHPMyAdmin screen in the textbook. Set up your columns like in this example – note how MySQL Workbench sets up your first column as a primary key by default.
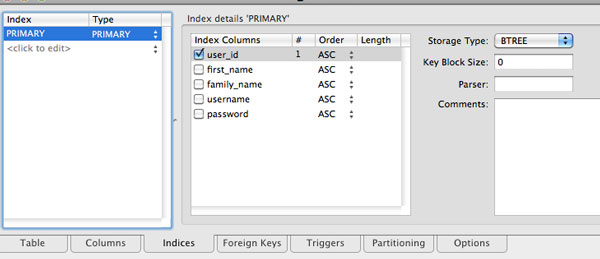
Finally click on the Indices tab to check on the Primary Key setting and select the BTree storage type. Then you can click Apply to create the SQL statement that will create the table. You may need to tell MySQL which database to create the table in, if that is the case, clicking Apply does not do anything or gives you an error. Go to a Scratch window in the SQL Editor, type ‘use jperetz’ or whatever your database name is, and click the lightening bolt to execute.
Importing Data from a .sql file in MySQL Workbench
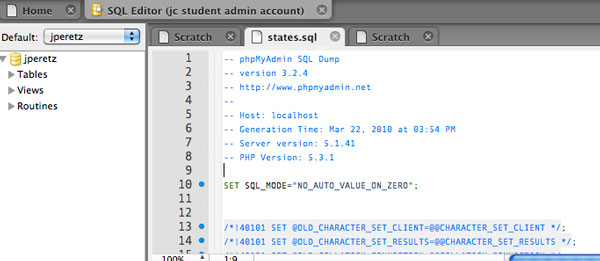
In the previous example we used the MySQL Workbench interface to create a database table. In this example we will use a .sql text file containing SQL scripts that accomplish the same thing. Click on “Open a SQL Script File” – the second button on the top of the MySQL Workbench interface and select the states.sql file (for the SQL class you are loading the music.sql file) from the textbook examples under Lesson 5 folder. The script will be visible within the MySQL.
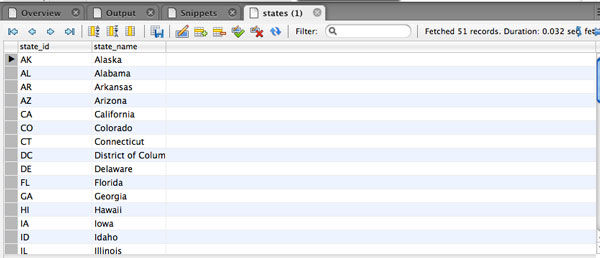
Before we can run the script in MySQL Workbench, we need to tell the server what database we want the table in, so click on the ‘scratch’ tab to bring up an ad-hoc SQL window and type ‘use jperetz’ or whatever your database name is and click on the lightening bolt to execute the command. You should see a record of your statement in the Output -> Actions window. Then click back on the states.sql (or music.sql) tab and click on the lightening bolt again to execute the script. You will get a series of actions, and possible errors, which may be OK. Click back on the overview tab and the refresh button and you should see the states table. Doubleclick on the the table icon and you will see the 51 states (including DC) listed in a datagrid.
Go back to the script file and explore the script to see how SQL is written. Go back to the data grid and update a row to see how the SQL Editor allows you to create tables and edit table data.
You just created two database tables in your MySQL database. Now we are going to create web applications that CRUD – create read update and delete database records (rows in tables.)

I made a table named ‘users’. Everything seemed to go well. I then went on to add the table of the states from Lesson 5. I expected to see both tables listed but only see the one for states.
Where are these tables stored?
Before running the script, you may need to enter the sql command use xxxxxxx, where xxxxxxx is your database name. I explain this in the post above.
Yes. I did that.
Where is the actual database stored?
This is the error message I get:
ERROR 1064: You have an error in your SQL syntax; check the manual that corresponds to your MySQL server version for the right syntax to use near ‘)
ENGINE = MyISAM’ at line 2
SQL Statement:
CREATE TABLE `lmcbee`.`users` (
)
ENGINE = MyISAM
That means that your statement is syntactically incorrect. There is no column information, you need at least one column to create a table.
Where is the actual database stored?
The MySQL database is stored on a server at the JC. You cannot see the data from the file system. It is only visible through SQL. SQL can be run from many different ‘clients’ such as a webpage or MySQL Workbench and you that is how you create the database definition and create, update, delete and query the data.
At the step ‘Importing Data from a .sql file in MySQL Workbench’, when I click on ‘Open a SQL Script File’ a window opens into My Documents on my desktop rather than into the database server to which I seem to be connected (but, maybe not?).
Yes, you should be opening the music.sql file which you can download here. music.sql
You open the connection to your database (admin account), open the file in MySQL Workbench from your computer, and then execute the statement (lightening bolt icon) and it updates the database server.
I was able to copy and paste the code into the scratch window and execute it, but the tables don’t seem to appear in the Overview window (but the ‘users’ table I had created earlier does appear). Shouldn’t I see them?
Also, to re-run the query, I had to add ‘DROP TABLE tablename;’ ahead of each ‘CREATE TABLE tablename’ statement to reset my attempts.
Update: Once I clicked on Query and selected the drop down option of ‘New Tab to Current Server’, the tables appeared.